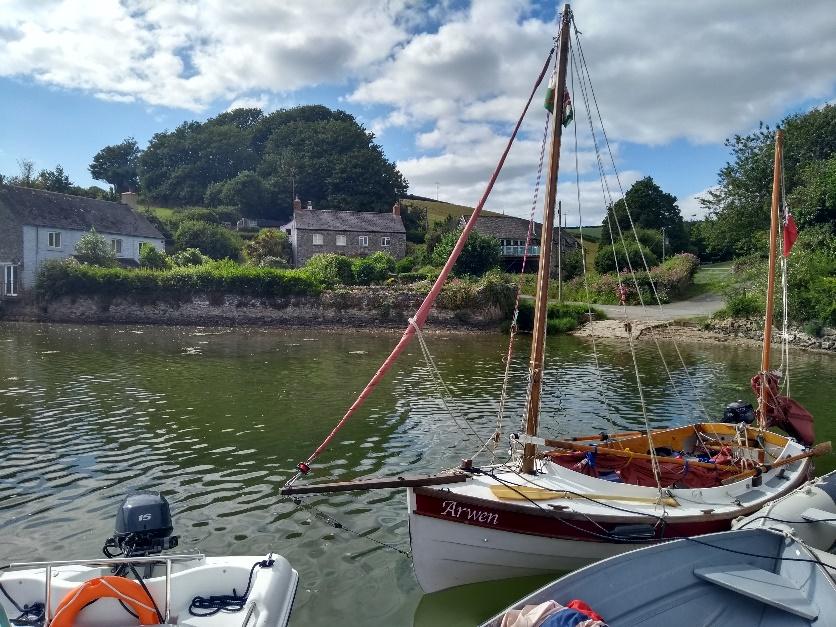
When building Arwen back in 2009, I opted for the standing lug yawl rig because to me it looked traditional with minimal standing rigging, a short mast and a boom and spar which could be stored inside the boat. There also seemed to be a variety of sail options when at sea. With very limited sailing experience only gained from RYA 1 and 2 courses on Laser 1’s in the Med, I had no real knowledge about a standing lug sail yawl (or sailing for that matter). Fast forward eleven years and I’m still trying to master the intricacies of what is a fairly simple rig. I am clearly then, a very, very slow learner!
So, let’s start with the obvious question - “Why haven’t I yet mastered using a standing lug sail?”
Learning on a Laser 1, I didn’t gain any real experience of using other sails before Arwen and now do no more than nine day sails a year! An absent-minded sort, I keep forgetting what to do, sail setting and trimming have yet to become ‘unconsciously automatic’ in my head like driving has. Until recently, I sadly suffered from ‘sailor’s laziness’ - as long as I was moving in the right direction, I was happy; more often than not, content to admire the scenery rather than trim the sails effectively to gain maximum efficiency in the conditions experienced at that time. What an awful confession to make!
Another question, an embarrassing one – “What did I do at the building stage that had such a negative effect on sail setting and trimming of my standing lug sail for many years?”
Well, I rushed the boat building process that’s for sure and the resultant lack of ‘planning fore-thought’ meant I didn’t fully consider some of the implications of any adaptations I introduced at the time. “A little knowledge is a dangerous thing”. “Rush in haste and repent at leisure” - cautionary lessons for us all!
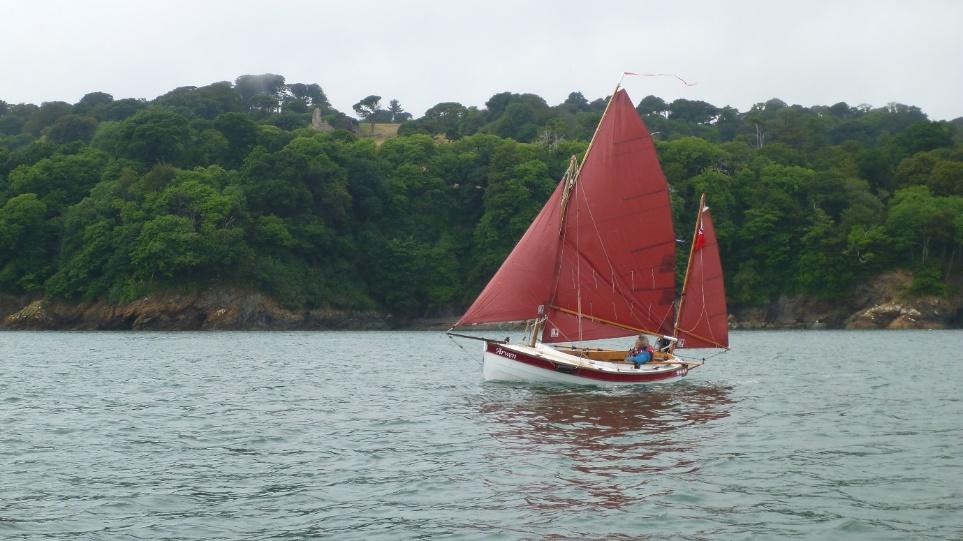
‘Content to just keep moving and admiring the scenery rather than actually spend effort trimming sails correctly – what a sad admission’ Photo: D Pickthall
A first mistake was keeping the sprit boom and top yard square instead of rounded which meant extra weight aloft, so affecting sail shape! Another slipup saw me fixing the throat end of the sail a little way back from the top yard end and then stretching the sail too taut before lashing the peak to the other end. Marlin hitch lacing along with this ‘over-tautness’ led to many creases up top. Recently shaving a lot of wood off both spars to create the circular diameter on the plans has brought a huge difference in sail raising and sail shape. Re-securing the ‘throat’ correctly, loosening the marlin hitch lacing slightly and easing the over tautness has removed several semi-permanent vertical creases.
Why did I ever fit a bronze mast band when it wasn’t on the plans? Its lower mast position led to lower shroud attachments, which in turn limited how far up the mast the yard could be hauled. The band has now gone, proper shroud and jib tangs fitted in their correct positions and the yard finally attains its proper height and position on the mast, giving much more headroom clearance in the cockpit below and a far better sail shape overall.
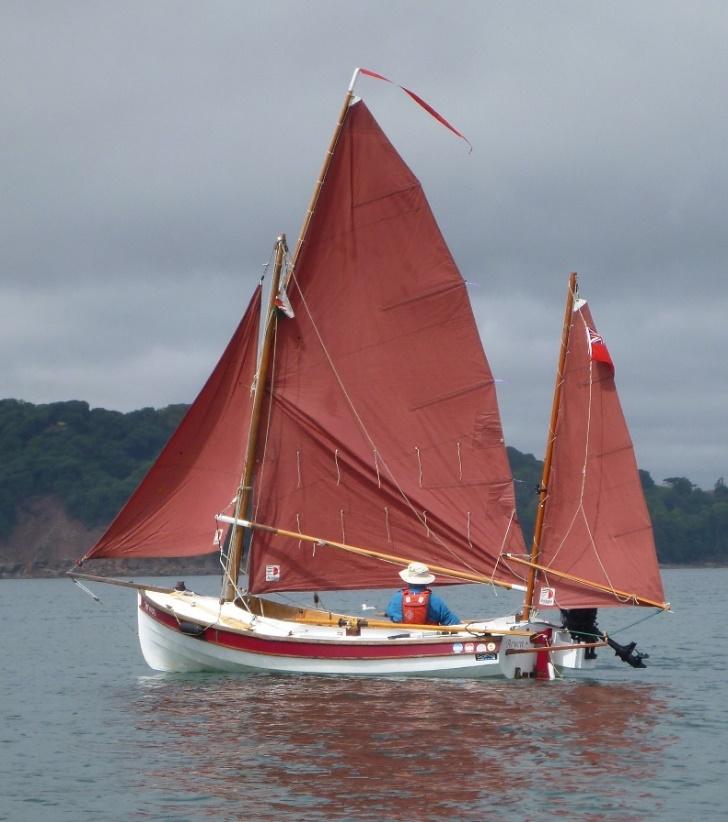
‘The tack of the sail was too far away from the base of the mast due to the extended foredeck. Hardly surprising then that I had a semi-permanent throat to clew crease’ Photo D. Pickthall
The standing lug sail has its tack attached to the mast via a set of parrel beads and the luff is not laced to the mast. Stupidly, I deviated from the plans, building the front coaming a few centimetres higher than it should have been and extending the foredeck aft a few centimetres more than specified. No, I can’t remember why - a silly error I came to bitterly regret. The tack parrel beads caught on the coaming top thus preventing the tack downhaul from working properly and the tack of the sail was too far away from the base of the mast due to the extended foredeck. Suffering lots of poor sail shape and performance, it took me ages to work out why!
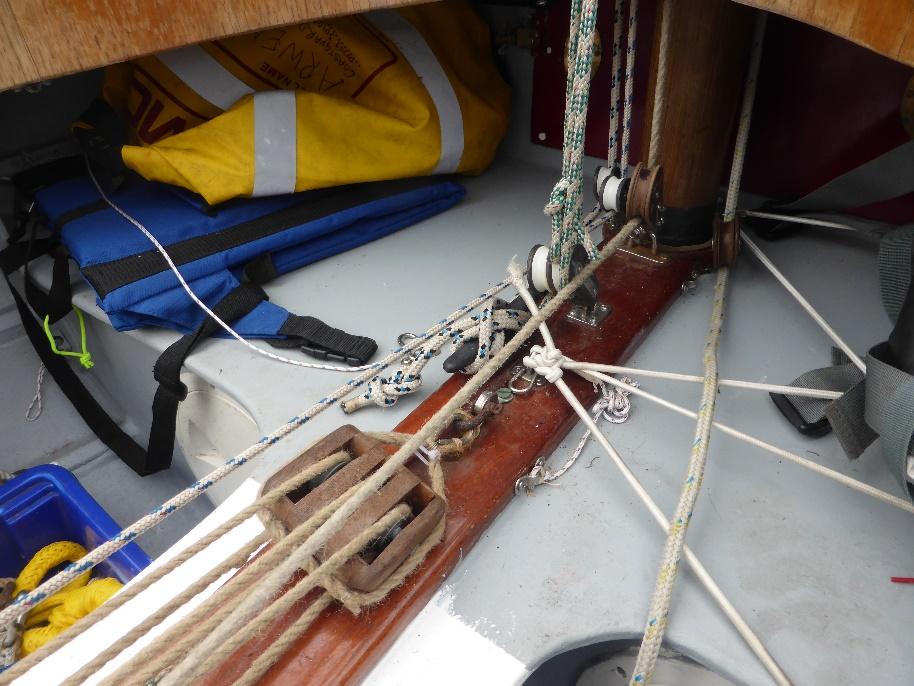
Drilling holes in the foredeck to set up a new tack downhaul system and to allow all lines to run to the aft cockpit.
Not wanting to cut coaming or foredeck, I’ve since drilled holes in the foredeck and set up a downhaul tackle system under the deck which allows me to add significant downhaul tension and retain the tack very close to the mast base. Sail shape and setting is now, of course, much better. What was it I said earlier about “a little knowledge is a dangerous thing?”
‘Below the fore deck, showing from right to left – mainsail halyard, topping lift, green flecked tack downhaul system, snotter halyard and far left jib halyard. Wooden blocks are centreboard downhaul tackle’.
The top yard always caused me problems. On Arwen it lies on the starboard side of her mast with part of the yard projecting forward of it. The sprit boom below lies on the port side. Keeping Arwen on a trailer meant untying the mainsail halyard from the yard each time the boat was trailered home. I didn’t work out or mark on the optimum position for bending on the halyard, thus on every new trip out I would tie it somewhere else. Too far aft on the yard and it was difficult to tension the luff, the yard tail heaviness was reduced and the sail didn’t attain its full height, proper angle or correct luff and leech tension. Poor sail shape, a bouncing upper yard and sprit boom equals distinct ‘unhappiness’ down in the cockpit! Too far forward and the sail was almost impossible to haul up, being too aft heavy. Additionally, the top yard kept sagging away and flogging against the mast in rising winds. When dropping the mainsail, the top yard would jam part way down the mast. Try standing up on the thwarts in a rolling sea, to ‘ease’ the top yard back down between the lazy jacks. No wonder I suffered sea sickness!
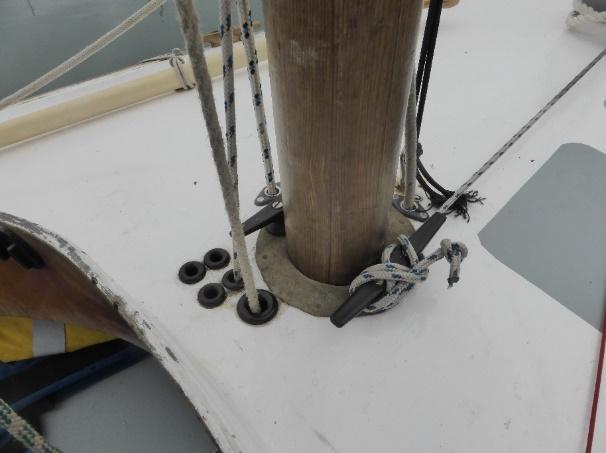
After lots of email correspondence, I finally worked out these mistakes and some solutions. I lashed a small stainless-steel ring at the 40% mark back from the forward end of the top yard and then another right at its very forward end (see photograph below). The leading edge of the halyard now comes out of the mast sheave, down through the upper ring, from the starboard side, runs around the port side of the mast and down the yard to the forward ring where it is tied off in a bowline. The mast is sandwiched between the yard and the loop of line. When hoisted, it no longer sags away or flogs and it smoothly descends the mast between the lazy jacks. The yard attains its correct height and near vertical angle and sail shape is much improved. I tried other systems including a carabiner tightening noose system, a bronze mast ring and a toggle and rope loop system but the one opted for seems to have worked best. In hindsight, perhaps replacing the upper ring with a small block instead might make the hauling up of the sail slightly easier? Any advice on this aspect would be welcomed.
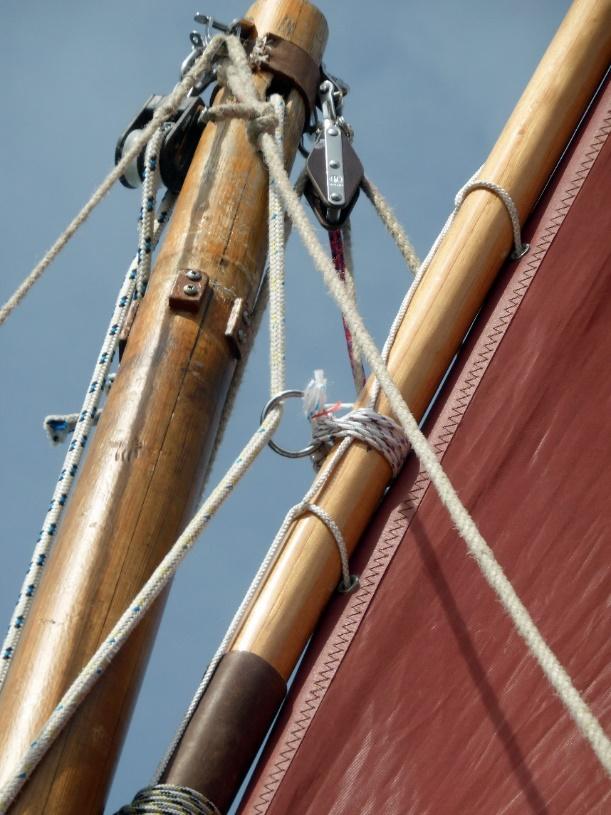
New arrangement for top yard - Bronze mast band removed (support blocks still remain). Mainsheet runs through steel loop. Upper loop will be replaced with better lashing, or a small block, or curved deck eye - advice welcomed.
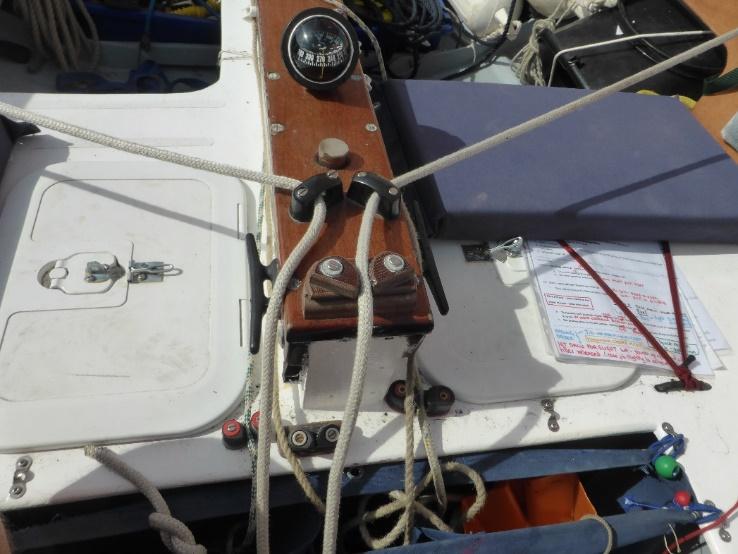
Finally, I made two other alterations to the running rigging in Arwen, neither of which seemed to have caused many problems thus far. Firstly, I ran all halyards and sheets aft to horn and cam cleats in the rear cockpit. Now I can alter and cleat everything without having to constantly move around the boat. Secondly, by lengthening the topping lift halyard, I can leave the furled sail on the boom semi attached to the mast, so that raising the mast and rigging Arwen fully now takes only 30 minutes.
Aft of the centreboard case arrangements - black deck eyes on top with Tufnol cleat - jib sheets; black cleat RHS - topping lift; cam cleat below - mainsail halyard. LHS black cleat - tack downhaul halyard; grey cam cleat below - snotter; red cam cleat - centreboard halyard.
So, the moral of this sorry tale thus far? If you are a newbie boat builder, think before deviating from the plans. Don’t make adaptations unless you are sure of what you are doing and you have anticipated what the consequences will be. I made lots of silly mistakes and only the diligent patience of people like John Welsford, other navigator owners and a good friend saved me. An experienced small boat sailor, my good friend even bravely accompanied me on day sails in Arwen to help work out my mistakes. Many people via my blog and YouTube channel offered advice, some even going through my sailing videos frame by frame to comment on what I was doing well and not so well and how I could correct such silly mistakes. I am indebted to everyone, for without their kind constructive advice, I would not have developed any understanding of the sail configuration on my boat or worked out the errors I’d built into it.
Proficient sailors find the standing lug sail easy to master, but alas, it has been a steep learning curve for me, which still continues today. “You don’t know what you don’t know” was one of my favourite maxims to my students but even so, it is pitiful that a sailor has to rely on others to explain to him the dynamics of his own sail plan because he is such a very, very slow learner!
So, with all this in mind, lets plunge into a simple third question – “How do I raise and then set my sails?”
Based on what I was taught on the RYA courses, I’d normally come head to wind using the sheeted in mizzen, before then raising sail. However, reading Roger Barnes’s book (
‘The Dinghy Cruising Companion’) was a constant epiphany of ‘sudden clarity’ to me; not least his assertion that in a small boat, you should be able to raise or lower the sails safely in any situation on any point of sail and that turning head to wind each time should be unnecessary if the rig was set up correctly. This year, frequently abandoning my ‘head to wind’ habit saw Arwen’s trim and heading rapidly altered just by shifting my weight around in the cockpit; even with the mizzen sheeted in tight. Additionally, the mainsail still takes some hauling up and because I do it slowly, the wind catches the partially hauled sail and chaos can ensue. Bluntly, I haven’t mastered sail hoisting in confined waters and I need to find a quicker way of getting that sail aloft. Others manage it with ease in their boats, so I’m doing something wrong!
Procedurally, to hoist mainsail, I loosen the snotter to move the sprit boom forward of the mast, release the downhaul halyard and then haul the topping lift slightly to raise the sprit boom and furled sail. Sail ties removed from aft cockpit, I haul on the mainsail halyard several times, making sure that the parrel beads run freely at the tack. Once the top yard has attained its correct position and near vertical angle, the halyard is cleated, the topping lift released so that the sprit boom lowers and I move forward to adjust the position of the snotter on the mast to angle the sprit boom correctly, before returning to the cockpit, from where I apply tack downhaul and snotter tension to remove any sail creases.
Having raised sail (it is far simpler than it sounds from the above description, except, when in narrow river channels up the Tamar, where it always feels a little fraught and frenetic) I then set and trim the sails to gain efficient sail shape and hull speed. It is somewhere around here though that I often go wrong. Remember, “you don’t know what you don’t know”, and of course, I can’t retain lots of ‘detail’ in my head. It’s hard being a slow learner!
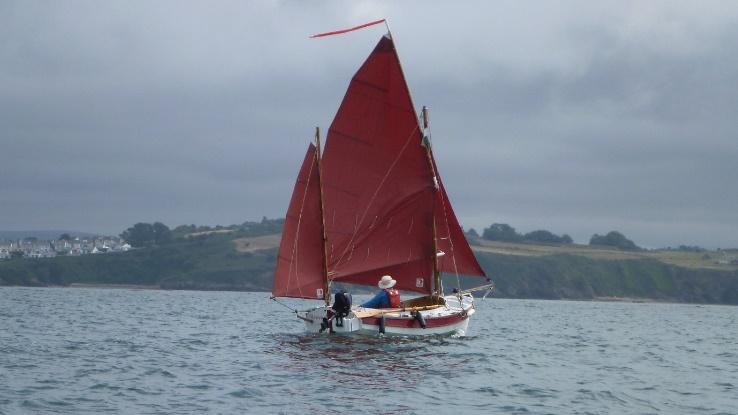
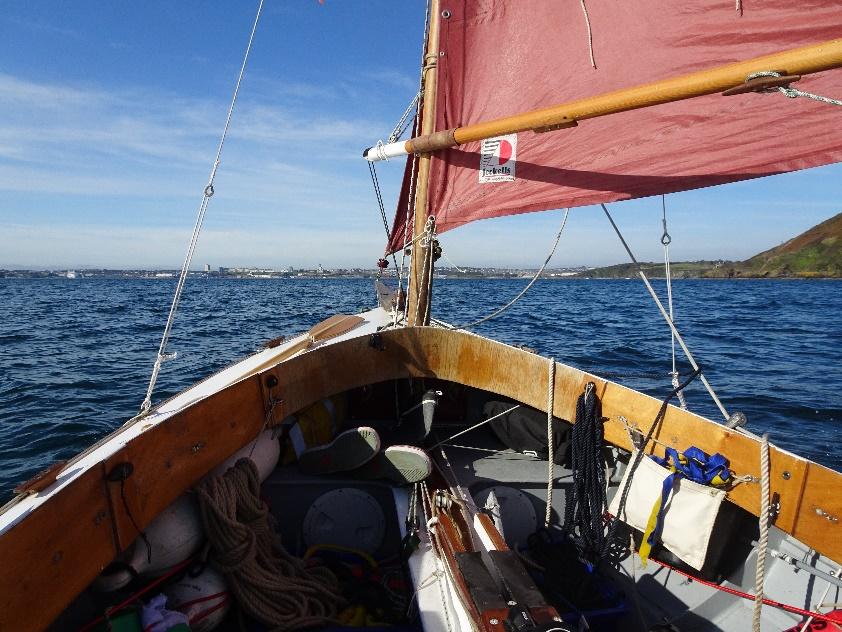
Sailing Plymouth Sound - poor seamanship - I forgot to take in those fendersand as for that sail trimming.
In winds up to ten knots, I sheet in mizzen first whilst keeping its snotter loose for a slightly baggier sail shape. Aiming for slight weather helm on the tiller, I then use the mizzen to set the sheet angle for the other sails and the pointing angle for Arwen. Ten to fifteen knot winds see me ease the mizzen sail and then the mainsail sheet, depending on the amount of weather helm on the tiller. I’m very hit and miss on judging weather helm but essentially, if tiller is pulling hard, I ease the mizzen first; if tiller is too light, I sheet the mizzen in a little. I genuinely have no idea whether all this is the right way to do things!
An experienced sailor I met in Salcombe told me that when easing sails, I should ease the jib first, then main, then mizzen. He also suggested when using and setting all three sails, I should first trim the jib and main for best angle of attack and get all the tell tales streaming aft and then trim the mizzen to gain a few degrees of weather helm.
Frankly, I’m very confused and I’ve had mixed results doing all the above but there have been some successes elsewhere. I’m better at making minor course adjustments using sails instead of tiller and at balancing the sails so that Arwen sails herself. Ease the mizzen and Arwen pivots gently away from the wind; sheet the mizzen in and her bow turns into the wind. Using similar tactics with the jib as well and now I make simple course corrections using the sails not rudder, thus maintaining a more constant speed. Sadly, I can’t recall this being taught on the RYA courses I did all those years ago. Maybe it was and I forgot – I am rather absent-minded! Setting Arwen up to sail herself on broad reaches and close hauls has also been fun. When I balance sails right, she holds her course really well, allowing me to set the helm impeder and grab a bite to eat or to sort out filming gear.
A fourth question - “How do I fine tune sail shape?”
Where do I start? Sail shape and sail trimming has been better since making the modifications described earlier as most creases have disappeared although, irritatingly, a stubborn faint throat to clew crease still remains.
If I understand my mainsail correctly, there are four places where I can make adjustments to the sail – tack downhaul, snotter tension/mast position, halyard attachment position on the top yard, and mainsheet attachment point on the aft sprit boom. To tighten the luff and ease the leech, I move the forward end of the sprit boom down the mast a little (I could move the halyard securing point on the yard forward slightly but never do). To tighten the leech and ease the luff, I move the sprit boom up the mast. Of course, being a very slow learner, I know what to do but not why I’m doing it! What impact does tightening or easing the luff and leech have on sailing speed etc? Remember “you don’t know what you don’t know” and if I did learn this, well rather embarrassingly, it didn’t stay long in my long-term memory.
Now this I understand better. A crease from tack to peak is removed through more outhaul tension on the sprit boom or easing the tack downhaul tackle. A clew to throat crease gets removed by moving the halyard back up the top yard or using more tension on the tack – my preferred method. Of course, another issue is actually getting the balance of adjustments between these various points right and sadly, I’ve yet to master that.
Apart from the importance of halyard tie on position on the top yard (explored earlier), sail luff tension also seems critical. I think ‘hard’ tension on the tack downhaul pulls the luff straight, prevents sail rotation, stops the boom moving forward of the mast and gets the yard upwards to its designed angle. At the same time, it tensions the leech thus lifting the aft end of the sprit boom into the correct sailing position. Conversely, I think too much luff tension causes an odd sail shape and more time spent fiddling with snotter and boom angles; which then leads to tensional creases in all directions because, frankly, I’m not understanding what it is I am really trying to do! Trying to get the correct luff tension is, in my view, a ‘dark art’, particularly when you then throw in something like increasing the luff tension to flatten the sail when winds are increasing! It seems to be a matter of ‘balancing’ the four-point adjustments and I am hopeless at doing that.
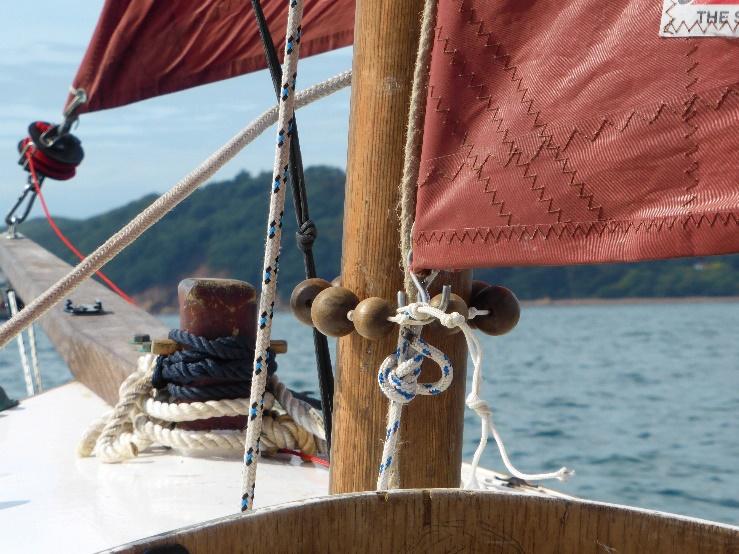
A single line to block and tackle arrangement below foredeck, allows hard tension to pull luff taut thus preventing sail rotation and forward movement of the boom past the mast whilst allowing the yard to attain its correct near vertical angle and position.
A blog subscriber of mine, helpfully explained the significance of the parrel bead loop attaching the luff to the main mast to me. “Whilst three of the four sail corners are attached to fixed spars, the fourth isn’t. That tack corner can float forward or aft if not secured and tensioned correctly and that affects the setting and tensioning of the lower part of the sail below the boom position. As the snotter is applied, pushing the boom aft, the lack of fixing of tack to mast means the tack is also pushed aft as well and so tension to remove any throat to clew crease is not applied and the lower sail shape doesn’t set correctly”. Take a look at one of the photographs accompanying this article and see how there was a huge gap between tack parallel loop and the mast; caused by that original mistake – remember, the higher coaming and extension of the foredeck? Such an acutely painful lesson to learn!
Lastly, I received some cautionary advice from John Welsford too. “One of the things that can affect the set of the sail is having a yard which is not stiff enough”. Apparently, if the yard flexes too much then any crease from throat to clew is impossible to remove. Ideally there should be around 70mm of flex in the yard in a 15-knot wind. “Any more than that and you lose control of the shape, any less and the sail won’t twist off to reduce the heeling effect in a gust”. That sent me into a panic – had I shaved too much off the top yard? Don’t seem to have, so I can breathe again! Phew!
And so, the penultimate question - “How do I use the sprit boom on a standing lug sail to best effect?”
One or two individuals suggested I just get rid of it - full stop! I rather like it and to be honest, I’m not sure what the implications would be of getting rid of it.
As I understand things, if I have this right, the sprit boom/snotter act as a vang and boom in one and eliminates the need for an outhaul on the sail/boom. The sail section below the boom prevents the sail and aft end of boom from moving up when the mainsheet is eased and stops the sail from twisting off to leeward.
I have yet to fully work out, or at the very least, I am confused about how to flatten the upper sail on Arwen’s standing lug sail with sprit boom rig. In gusts, I merely ease the mainsheet or head up into the wind slightly but in doing so I lose speed. I alter downhaul luff tension to suit changing conditions during the day - medium tension in light winds, firmer tension when moving nice and flat and full on tension when Arwen starts to heel, but is that all I have to do? I sometimes tension the snotter to bring the boom aft to flatten the sail during stronger winds; conversely easing it during light winds to make the sail baggier. It all seems to work but I feel I am missing a trick or two here and whilst the simplicity of the sprit boom is a boon to sailors who know what they are doing with it, for me it seems to need Jedi like powers to sort it out and understand what impact it has on sail shape, performance and boat speed.
Showing snotter and tack downhaul arrangement at lower mast. All lines lead aft to rear cockpit.
And then, of course, there is the reefing issue! I’ve tried to keep reefing simple by adopting a sort of slab or jiffy reef system. Turning head to wind, I furl the jib and sheet in the mizzen. I then ease the snotter and disconnect the tack downhaul before pulling on the clew reef line so that the leech of the sail is pulled down towards the boom, to the first reef cringle. I then ease the main halyard until the luff reef cringle is level with the boom before attaching the tack downhaul to it and then applying luff tension afterwards. The spare sail gets brailed up and the snotter is re-set. To be truthful, I don’t know whether this is the best way of doing it and I don’t practise reefing sails enough. One of the problems of course, is that I have to move back to the aft centre case to re-tension the tack downhaul before working back along the sail to braille it up. Recently, I’ve found it easier to drop the whole sail into the boat, do the reefing whilst the sail lies within the cockpit and then just re raise it and apply luff tension at the end.
Occasionally, after reefing, the sprit boom extends further forward of the mast thereby catching the leech of the jib. I don’t understand why this is but I get around it by sailing without the jib. Rightly or wrongly, I tend to consider furling the jib as my ‘first’ reef anyway and so reefing the main for the first time is then my ‘second’ reef.
The final question (and well done to you on getting this far) - “What have I learned about using the mizzen sail?”
Under skilled hands it can be used to great effect in tight anchorages for sailing off buoy or anchor but I’ve still to master the mere basics! So far, I’ve used the mizzen to help me come about when tacking. Instead of backing the jib, I occasionally reach over my head and use the front of the mizzen boom like a tiller, pushing it hard to port in conjunction with tiller to move me from port to starboard tack. Generally, when tacking, I avoid sheeting the mizzen in tight until I have moved onto my new tack, otherwise it points Arwen head to wind and brings her to a mid-tack stop. All basic stuff I know, but I am still trying to get the hang of it. So much to remember and internalise, but I do with fairness to myself, use it to set the weather helm balance and of course to point Arwen head to wind as and when necessary.
To conclude – it has been a slow, slow learning curve about using a standing lug sail yawl rig to any effect and I’m hoping I have some of the above right. At the very least, I hope it generates discussion and comment as I still have much to learn and understand about this rig. Many adept sailors use the standing lug sail with ease and delight. Me, I’m still trying to work it all out and then retain it in my head.
Arwwen tied up at South Pool Creek Pontoon in the Kingsbridge estuary.
My thanks to you for reading this far. My wife, my erstwhile proof-reader, suggested I could have edited this substantially down to six words – “pull sails up, drop sails down”. Ignoring her guidance, any useful advice from readers is most welcome. In the meantime, take care, enjoy your next time out on the water and if you see a white hulled Welsford ‘navigator’ with burgundy sheer plank and tan sails, along the south Devon coastline, showing a faint throat to clew crease – come over and save me!
